While a number of blockchain networks are growing, having a crypto wallet that allows you to interact with any network is nothing less than a miracle. Inclusiveness and power in your hand this is what a decentralized network promises users. Thanks to crypto innovations, which are filling this space with great developments and allowing users to customise their wallet to interact with any custom network. How cool it is!
Welcome to the dynamic and exciting landscape of cryptocurrencies! So, you’re wondering how to add a custom network to your crypto wallet, huh? You’ve come to the right spot!
Think of your crypto wallet as your personal treasure chest for all things digital. And guess what? You can make that treasure chest even more unique.
Stick around, and we’ll show you the ropes.
What is a Custom Network?
Imagine you’ve got a favorite radio station that doesn’t come pre-set in your car. What do you do? You manually tune it in, right?
A custom network works in a similar way. It’s a specific blockchain network that you can manually add to your crypto wallet because it doesn’t come as a default option.
For instance, let’s say you’re excited about Avalanche Blockchain, a rising star in the blockchain universe. While you might be eagerly waiting for Klever to officially support an Avalanche Wallet, you don’t have to sit on your hands.
You can add Avalanche as a custom network today, start storing your $AVAX, and enjoy all the top-notch security and features that come with a Klever crypto wallet.
Why Add a Custom Network to Your Klever Wallet?
While reading this article, you might wonder why one should add a custom network to a Klever crypto wallet. Don’t worry, here is an answer.
- Flexibility: Adding a custom network opens up a world of possibilities. Whether you’re dabbling in niche tokens or participating in a new DeFi project, custom networks have you covered.
- Niche Coins: Ever heard of a token that’s about to moon but can’t find it in your wallet? Adding a custom network lets you get in on the ground floor of exciting new ventures.
- Personalization: Your Wallet, Your Rules! Custom networks allow you to tailor your crypto wallet to fit your unique crypto journey.
- Compatibility with EVM: One of the standout features of Klever Wallet is its compatibility with the Ethereum Virtual Machine (EVM). This means you can add any EVM-compatible blockchain as a custom network, expanding your crypto asset management possibilities even further.
- Security Features of Klever Wallet: Klever Wallet isn’t just about flexibility and personalization; it’s also a fortress for your digital assets. With advanced encryption and biometric features, you can rest easy knowing your fund is guarded by some of the best security protocols in the industry.
3 Simple Steps To Add A Custom Network To Your Klever App
Eager to elevate your Klever Wallet experience? Hold tight, as we guide you through the straightforward yet empowering steps to add your very own custom network. Believe us, it’s a breeze, and the sky’s the limit!
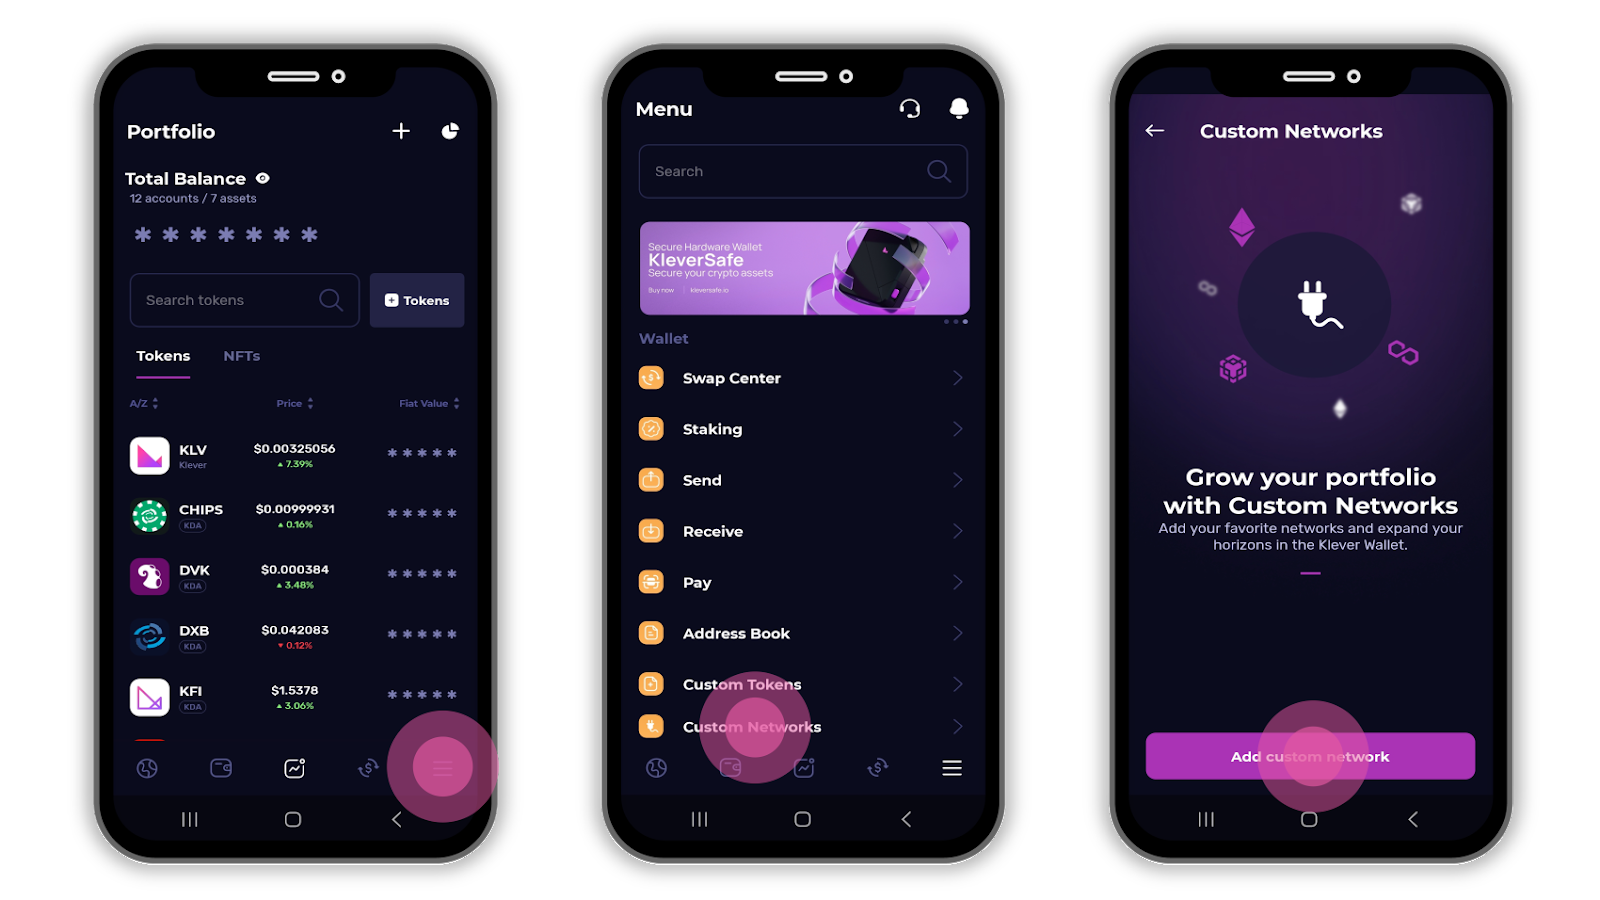
Step 1: Navigate to Custom Networks
First, tap the three-bar Settings icon located at the bottom-right of your screen. From there, choose “Custom Networks” and hit the “Add custom network” button.

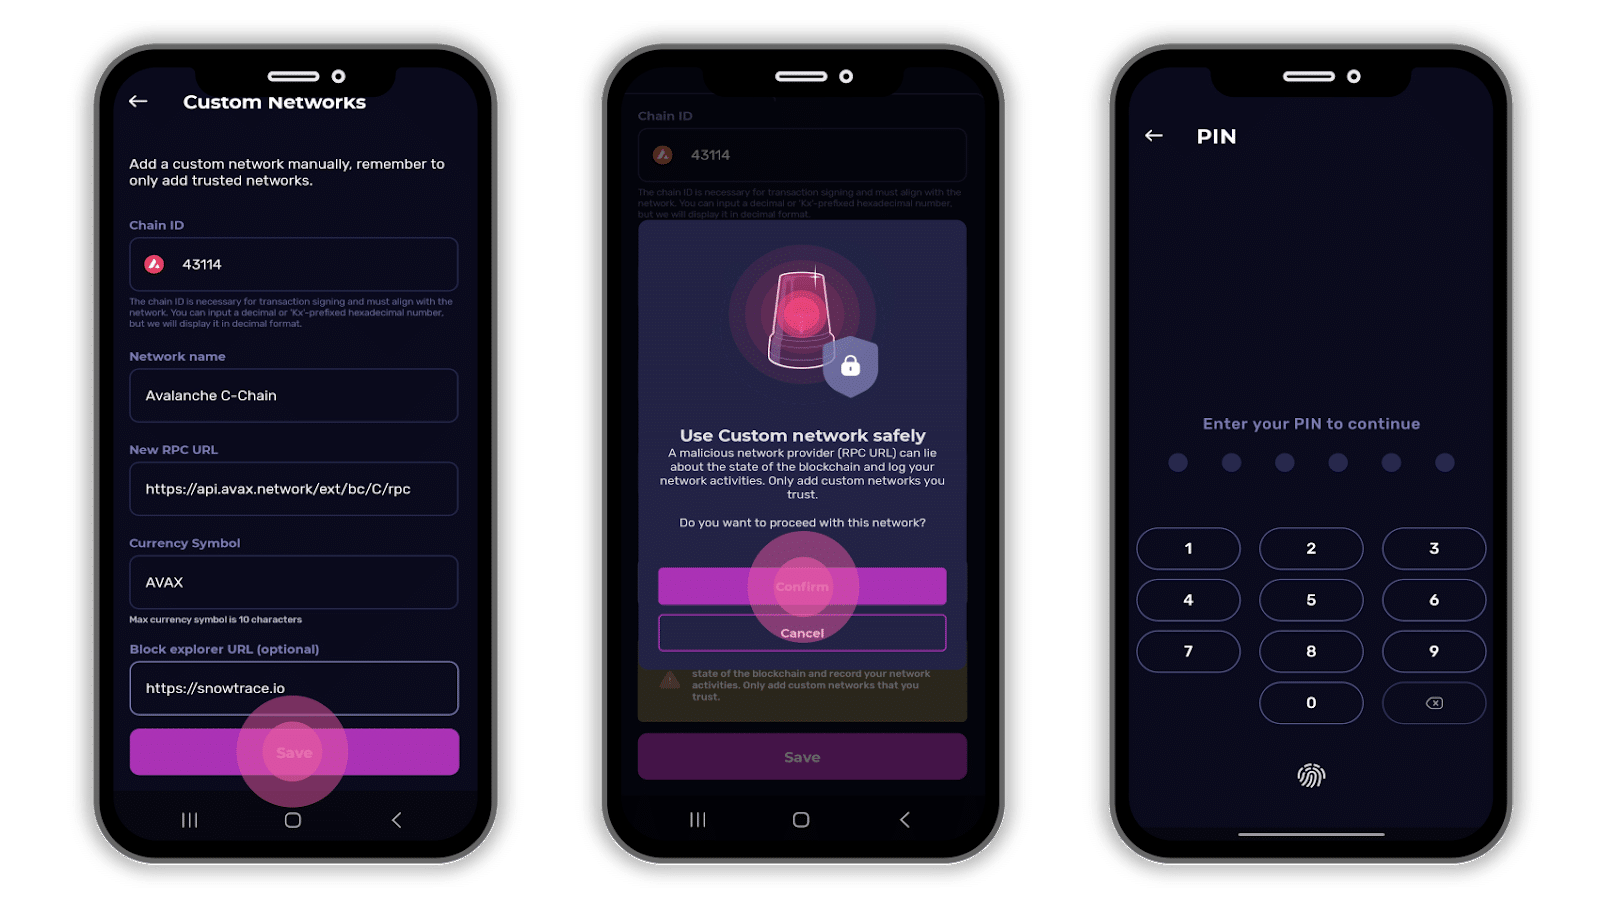
Step 2: Enter Network Details and Confirm
Begin by entering the Chain ID and other required network details. Once done, hit “Save.” Make sure to read the safety notice attentively before tapping “Confirm.” Finally, secure your action by entering your PIN or using biometric verification.

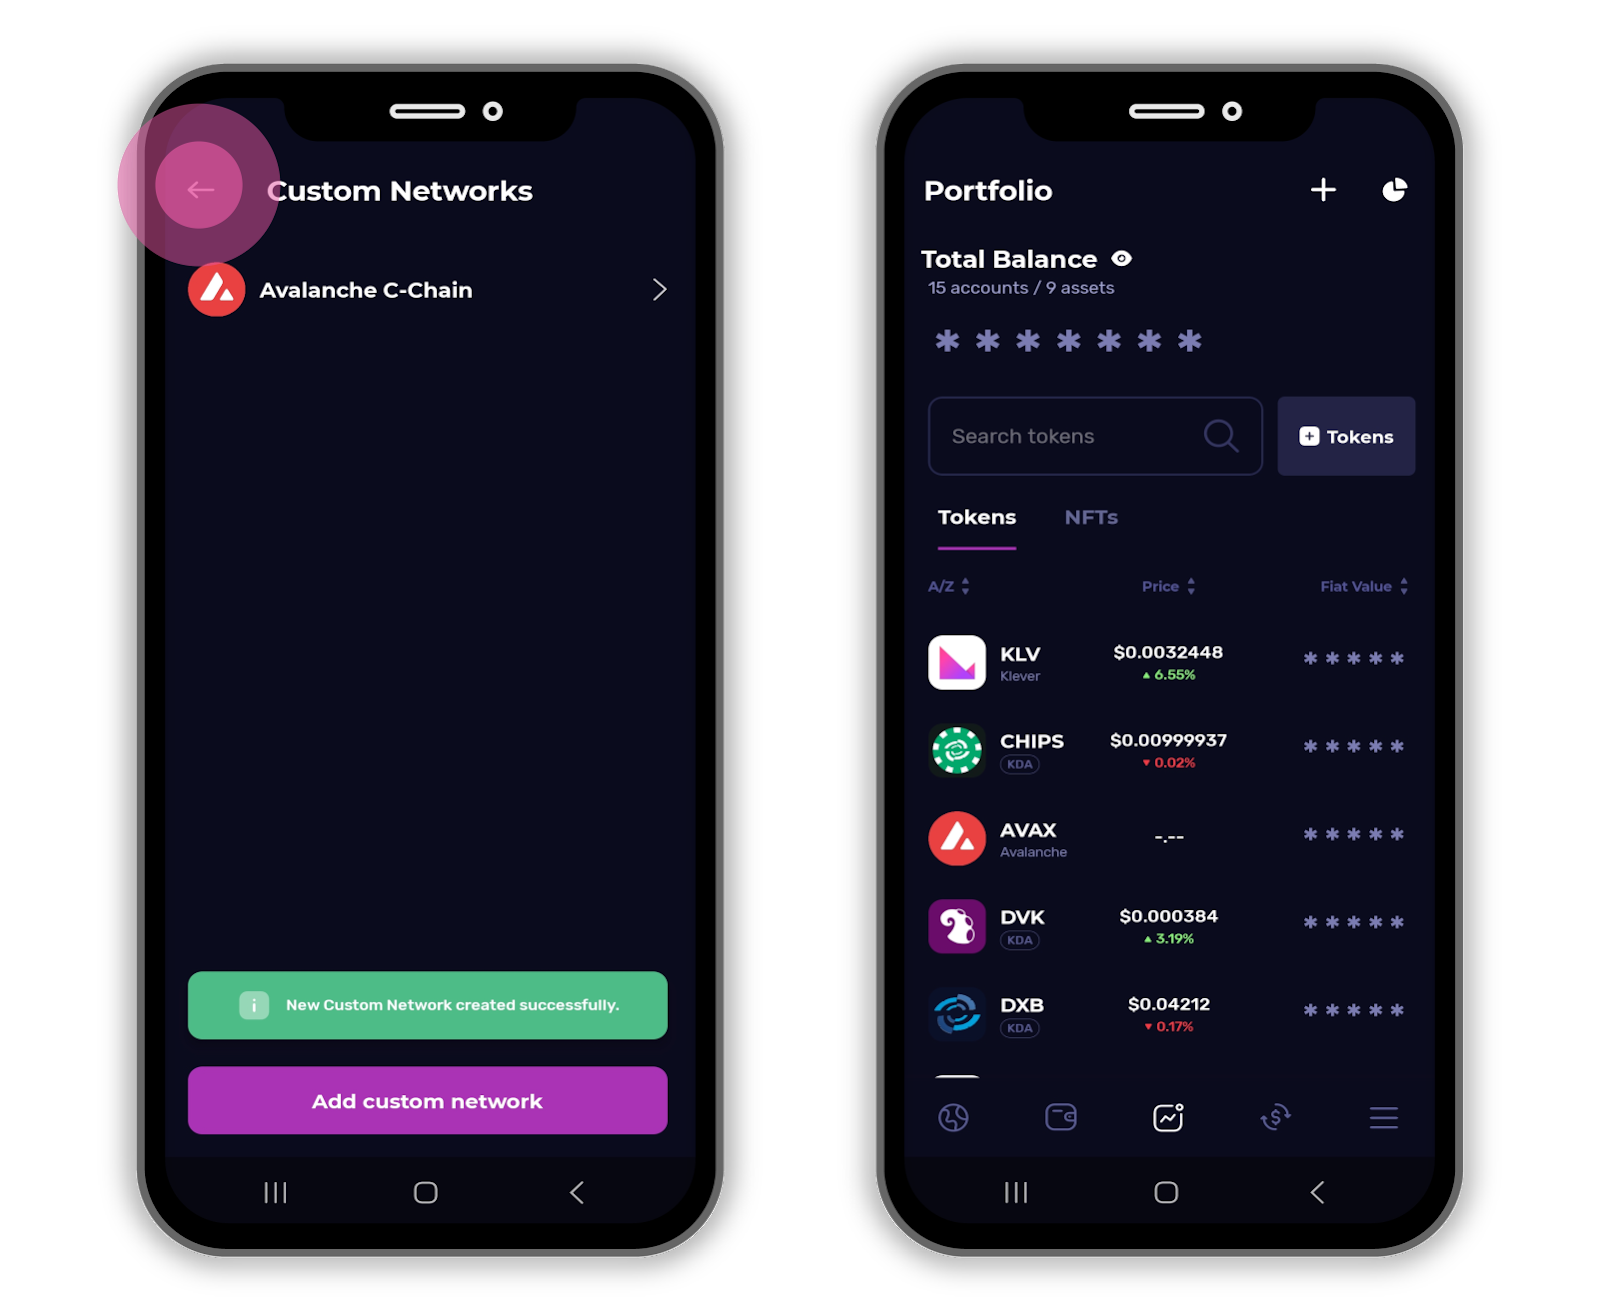
Step 3: Final Confirmation and Portfolio Update
A message will appear confirming that you’ve successfully added the new custom network. To return to your Portfolio screen, simply tap the back-arrow. You’ll now see the primary token of your newly added network displayed (for example, Avalanche).

Safety Precautions
Remember, with great power comes great responsibility. Only add approved & verified networks. Exercise caution to avoid malicious ones. The best source for a network data is from the related-blockchain team. A malicious network provider can lie about the state of the blockchain and record your network activities. Only add custom networks that you trust.
Also Read: How to Protect Against Crypto Scams and Ponzi Schemes
Concluding:
So there you have it—a simple, yet transformative, guide on how to add a custom network to your Klever Wallet.
By now, you should not only understand the ins and outs of custom networks but also appreciate the multitude of features and security layers that Klever Wallet offers.
From buying crypto with your credit card to enjoying the peace of mind that comes with advanced security protocols, Klever Wallet is more than just a wallet—it’s your gateway to the expansive universe of cryptocurrencies.
So go ahead, add that custom network, store your $AVAX or any other token you want, and take full control of your digital assets. The crypto world is your oyster, and with Klever Wallet, you’re well-equipped to explore it!


